Open the Survivor creator
Abyssal Escape customization starts with your own Survivor, not a fixed hero from another Sonic game. This Abyssal Escape customization walkthrough follows visible mouse-and-keyboard footage uploaded on October 17, 2026; it is not a claim that we played or tested account saving. The official Roblox game page confirms character customization and separately describes equipping abilities.
- Bring up the Survivor panel and look for Your Survivor below the character preview. AverageX's tutorial at 00:45 shows this screen, with a round character icon selected on the left.
- Check Current Slot beside the preview. The footage shows arrows beside its number. Identify your intended slot before editing; the number shown in a tutorial is not a slot you must copy.
- Select Customize Survivor under the slot indicator. By 00:50, the editing menu is visible on the left.
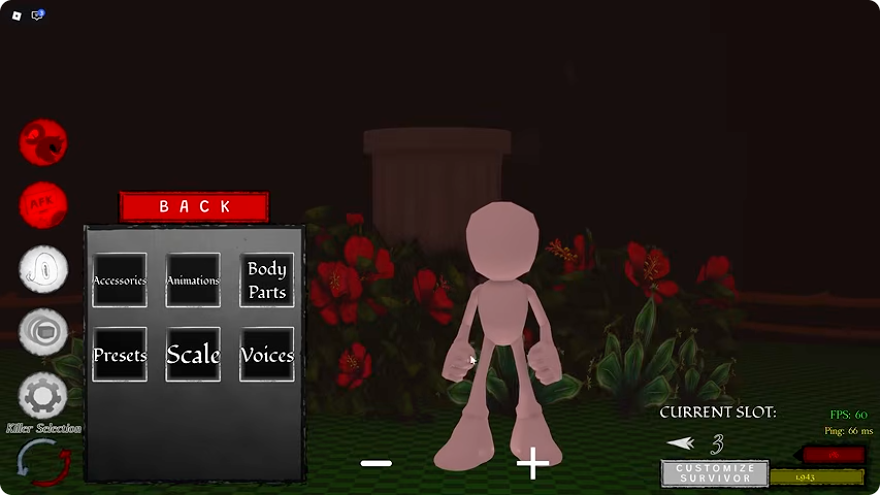
Community tutorial frame: AverageX, 00:50. The six entries are Accessories, Animations, Body Parts, Presets, Scale and Voices. Match the labels rather than the illustrated character or slot number. This page covers body coloring and accessory controls; it does not provide an animation, voice or preset catalog.
Choose the right editing menu
Use the menu that matches the change you want. Coloring a body part is a different operation from selecting an accessory or moving it into place. Starting with one small change makes it easier to notice which part the editor actually affects.
| Your goal | Menu or control shown | What to check |
|---|---|---|
| Change a body region's color | Body Parts, then a named region | The intended region is outlined in the preview |
| Add or replace a visible part | Accessories, then a part category | The chosen option appears on the character |
| Adjust an accessory's placement | Edit Accessory Position | The adjustment panel names the active mode |
| Find overall scale controls | Scale | The tutorial shows a scale slider; no recommended size is established here |
In yezeekers' ALAN tutorial at 00:30, the accessory categories include Backspines, Chest Furs, Chests, Ears, Eyes, Glovecuffs, Hairs, Hats and Left Arm Type. Later footage shows Tails and Torso Accessories. These are examples visible in that recording, not a complete current inventory.
Choose a category and then an option within it. The ALAN example changes several components of an existing orange character; it is not evidence of a one-click ALAN preset. For a first attempt, changing one component is easier to compare than replacing the entire character at once.
Change body and accessory colors
For body coloring, open Body Parts and select the named region you want to change. In AverageX's 01:00 frame, LeftArm is selected and the corresponding arm is outlined. At 01:40, Head is selected and the head is blue while the remaining body keeps its earlier color.
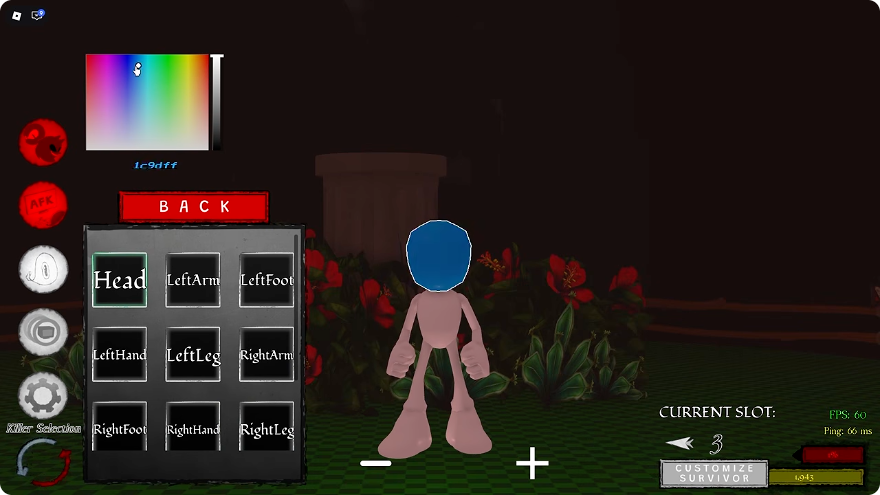
Community tutorial frame: AverageX, 01:40. The color area and vertical slider are above the part list; a Hex Code field is beneath them. The tutorial also demonstrates a red head with ff0000 at 01:31. That is a body-color example, not a character import code.
| What you are coloring | Selection to check first | Relevant visible controls |
|---|---|---|
| A body region | Its named Body Parts entry and outline | Color area, vertical slider, Hex Code |
| An accessory | Its selected option inside Accessories | Edit Accessory Part Colors / Material |
| A different region or accessory | The new selection, not just the last color | Check the preview again before continuing |
For accessories, the ALAN tutorial at 00:45 shows Edit Accessory Part Colors / Material beside the chosen option. A color area and material list are visible above. Do not assume that selecting a color while one item is active recolors every other component.
Our suggested first check is a single, obvious color change on one body region. Compare the selected region with the preview, then return to your preferred color. This is an editing check, not a verified recovery method for a bug. If an unrelated region changes, stop making additional changes and record which item was selected.
Align and resize accessories
After choosing an accessory, use Edit Accessory Position to find its adjustment tools. Despite that button's name, the panel includes three modes: Size Mode, Position Mode and Rotation Mode. A label above the panel identifies the active operation, and the panel includes sliders and a Confirm button.
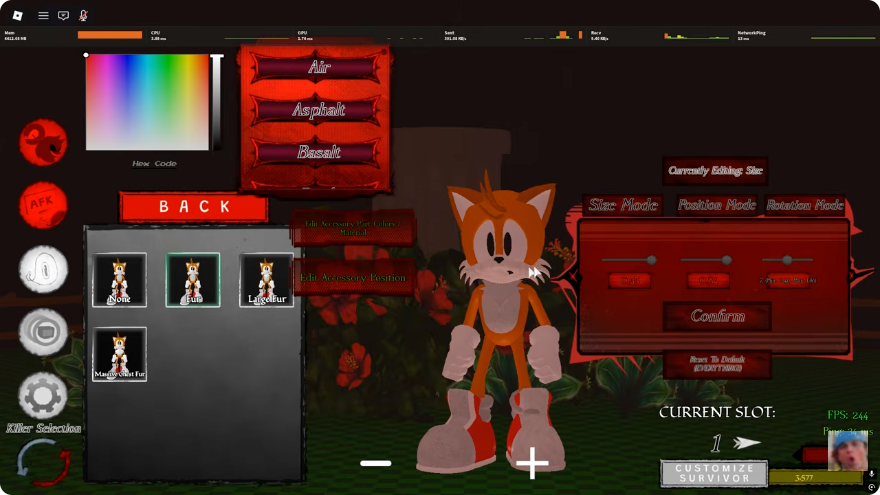
Community tutorial frame: yezeekers, 00:45. The panel reads Currently Editing: Size. At 04:30, the same tutorial shows the tail selected with Currently Editing: Position. Check that label before moving a slider.
| Adjustment mode | Change to inspect | Useful comparison |
|---|---|---|
| Size Mode | The selected part's dimensions | Does it still fit beside neighboring parts? |
| Position Mode | The selected part's location | Is it aligned with the intended attachment area? |
| Rotation Mode | The selected part's orientation | Does its angle match the rest of the design? |
Change one control at a time and compare the result before changing another. A part that appears too large may instead be positioned too close to the camera; changing several modes together makes that harder to distinguish. These are inspection suggestions, not measured values for reproducing ALAN or another named character.
Confirm appears inside the accessory-adjustment panel. Treat it as that panel's confirmation control, not proof that your entire Survivor has been stored on the server. The footage also shows Reset To Default beneath these tools. This guide does not establish its full behavior or recommend it as an undo button or an account-wide reset.
Check your result and the saving limit
Abyssal Escape customization can produce a recognizable assembled character: the ALAN tutorial at 05:10 shows the orange character with its selected facial features, clothing and tail. That demonstrates an appearance in the editor, not persistence after leaving the game.
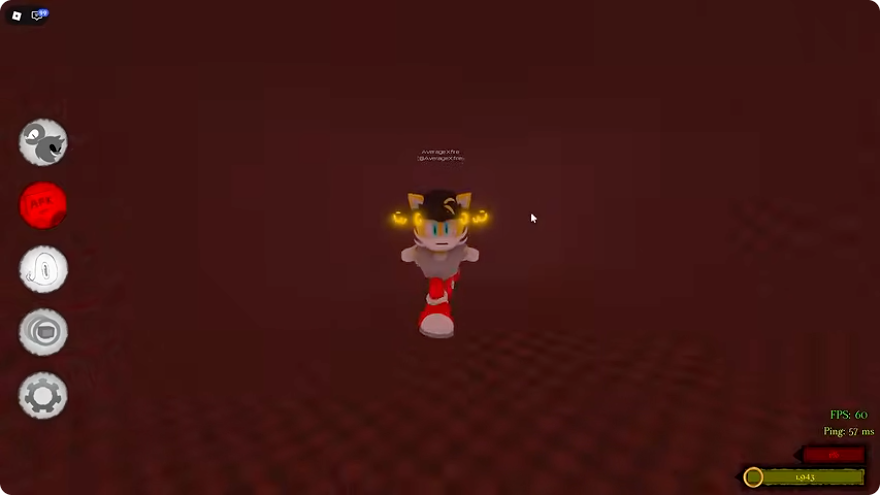
Community tutorial frame: AverageX, 08:55. The hat-wearing character seen in the editor appears in the lobby. This supports a visible result outside the editor within the recording, but does not show a leave-and-rejoin test or establish the intervening save controls.
Before ending an editing session, compare your intended slot, body colors and accessory alignment with your reference. Keep an image of the result and any settings you want to reproduce. A screenshot records the appearance only; it is not a backup or an importable preset.
The reviewed clips do not establish a reliable whole-character save button, autosave timing, exit sequence or leave-and-rejoin result. We therefore cannot tell you that pressing Back, Confirm, switching slots or closing Roblox safely saves a character. Do not use a valuable finished design to test an unverified exit procedure. Completing that part of this guide requires an observed save, exit and reload of the same slot.
Community reports in the launch-week creator discussion describe alignment and organization difficulties. They do not prove a universal bug or a reliable fix. The game is Alpha, and a different interface should be checked against newer footage rather than forced to match these October 17 examples.
Abyssal Escape customization questions
Where do I start Abyssal Escape customization?
Find Your Survivor, check Current Slot and select Customize Survivor. The illustrated menu then separates Body Parts, Accessories and the other creator categories. The screenshots are from community PC footage, not a tested mobile or controller walkthrough.
Why does Abyssal Escape customization color only one part?
The tutorial shows individual body-region selection. Check the selected name and outline before changing color. Accessories have a separate part-color/material control. The reviewed footage does not establish a single control that recolors the whole character.
Does Confirm save my whole Abyssal Escape customization?
That is not established. The Confirm button shown here belongs to the accessory-adjustment panel. No reviewed save-and-rejoin test proves account persistence, so it must not be presented as a whole-character save instruction.
Does Abyssal Escape customization equip combat abilities?
The developer describes appearance customization and equippable abilities separately. These creator screenshots do not establish ability effects, slot rules or unlock costs. Use the ability reference for its separately attributed sources, or the beginner guide for the round objective.